Intro | Haytor | Haytor Quarry | Lowman | Myrtle Turtle Quarry | Holwell Area | Smallacombe | First Ascent details
HAYTOR
Approach From Bovey Tracey follow signs towards Widecombe. These should lead you uphill for a few miles. At the very top of the hill a large lump of granite is visible to the right of the road. Park in the car park at the top of the hill, on the left.
A 5 minute walk up the hill leads to the crag - the one on the right is Haytor whilst the diminutive lump on the left marks the top of Lowman (the routes are on the 150 ft face the other side).
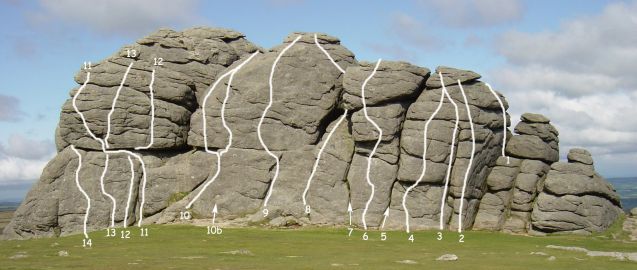
East Face
Routes are described Right to Left
1) Double Bubble E1 6a
Starting from the top "step" climb the short wall above to a extended rounded finish! FA Martin Perry2) Accomplice to Murder E1 5a
An elimate route up the pillar/arete to the right of the wide crack. Probably best treated as a high-ball boulder problem.3) Aramis HS 4b *
A veritable classic up the off-width crack; the sensible will bridge where others struggle up the depths! A couple of large cams take the sting out of it.4) D'Artagnan HVS 5c
A tricky and sometimes perplexing sequence gains the shallow, hanging crack above the overhang. The gear enables easier retreat should you fail on the crux but is a bit low once you move around the roof.5) Athos Difficult
The well-used crack (i.e the second in from the right).6) Haggis HVS 5a **
A superb and testing HVS with two contrasting halves; a delicate slab and a not-so-delicate overhang. A small cam can be placed in the overhang but back it up as it has been known to rip! Variation finish HVS 4c From the top of the lower slab move around the left until beneath a bulging arete (have a rest on the large ledge if you fancy!) - climb the steep arete above!7) ... Diff
Another polished crack8) Step Across Difficult
Climb either of the two cracks to the ledge then bridge between the two sides of the chimney until a pull leads onto the left (facing the crag) wall - an excellent little move. The narrow slab between the 2 cracks at the start provides a slightly trickier variation.9) Bulging Wall Very Difficult
The pleasant juggy crack leads to a ledge which is gained "with interest". Move left then climb the easiest line up to the top.There are numerous ways of climbing the top wall, the hardest goes at about VS.
10) Zig Zag Diff
Climb the rightward slanting slab to an overhang then move left and climb the wall above on jugs.Variation: Move right at the overhang onto the ledge, then up and back left onto flake and then the top.The wall to the right of the start of Zig Zag provides a fine, high boulder problem at 5b.
To the left is chimney at 15 feet - this can provide a short cut down from the routes.
11) Hangover E1 5a
Strenuous but well protected.Layback the crack to gain a break; traverse left for 10 ft or so until large (and suspect!) flakes lead up and left to the top.12) Rock Lobster E3 6b
A tricky little number. Climb the wall to the left of the initial layback of Hangover to gain the break. Move right and climb the vague line to the top. There is also a worthwhile variation (12b Big Fish Eats Little Fish E3 6b) from the break climb the line directly above (i.e. the gap between Rock Lobster and Don't Stop Now).13) Don't Stop Now E2 5c
An old sandbag at E1 - still no push over at E2 given the pokey lower wall.The disappearing crack in the centre of the wall leads to hard, bold moves to gain the mid-height break. Climb above on good flakes until a long span right leads to easier climbing and the top. Start up Letterbox Wall to give a fine E1 5b.14) Letterbox Wall VS 5b, 4b
An excellent little boulder problem. Left of Don't Stop Now is a good jug - The Letterbox - get stood on this, move up then stretch (if you're tall enough) to good holds up and left. Nip up and around the corner to a large sloping ledge (AKA The Meadow).Climb the middle of the wall above.15) Grey Mare's Groove Diff
Scramble up to The Meadow, then scramble up the right hand side of the back.16) Cobleigh's Chimney Diff
The left hand chimney to gain The Meadow then the left hand crack above and wall to the top.17) Funky Gibbon E3 5c #
An eliminate up the wall above and left of The Meadow. Bridging rightwards into the corner reduces the grade somewhat.18) Frog's Failure E1 5a
A line up the arete to the left. Be careful!
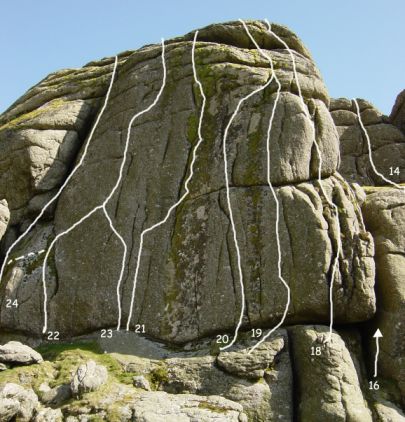
NORTH FACE
The right hand wall provides some of the best high grade bold climbing on the Moor. Unfortunately moss and lichen is often prevalent so it would be wise to send your mate and wire brush down on an ab rope first! Please limit your cleaning and don't remove huge swathes of moss.
19) Rough N Ready E6 6b *
Climb the unprotected and precarious right hand runnel to gain the halfway break. Place some good gear (as many medium cams possible) then run it out ("like a kettle flex") up the runnel above with the technical crux at top.20) Glass Bead Game E5 6a
A high quality but very rarely repeated route up the shallow runnels left of Rough N Ready. Climb the left hand of the two parellel runnels to gain a break then climb the wall above, moving right to gain the same exit straighforward exit groove of Rough N Ready.21) Rough Diamond E4 6a **
Climbed much less than it deserves - an excellent route but unfortunately the moss puts most people off. In the centre of the wall is the deepest crackline; gain this from down and left with some rather tricky climbing. The main crack itself provides somewhat better protected (medium cams) climbing that can be laybacked or jammed.22) Rough Justice E5 6a ***
A mega-route up the left hand line on the wall. Excellent fall potential from the crux and above. From the easy slab on the left (gained either up a drainage runnel or from North Face Chimney) move right onto the steeper slab and gain a shallow crack on the right (Friends).Climb up to a peg (crucial back-up wire just below) then move up, left and up to a groove (considerably easier for the tall). Climb more or less directly above to the top ... but don't fall off!!23) Direct Justice E5 6b
A tricky start to an aleady tricky route. From the start of Rough Diamond climb straight up and left to gain Rough Justice. A bouldering mat will take some of the sting out of this.24) North Face Chimney VS 4b
The green chimney. Bold.
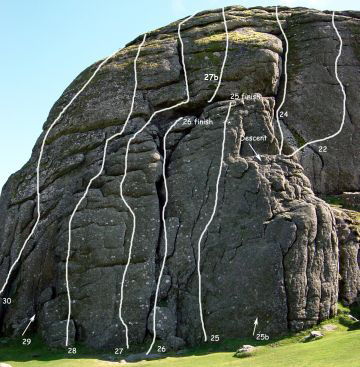
To the left of North Face Chimney is a giant detatched flake, the front face of which provides the first 2 routes and first pitches of the following 2.
25) Bridle Piton Slab Difficult
The slab right of the central crack is covered in flakes. Enjoyable.The slabby wall to the right provides a good boulder problem at 5a (marked 25b on topo).
26) Central Chimney Difficult
The wide crack left of Bridle Piton Slab.Descent from the previous 2 routes can be made via the rib to the left (looking down) - marked on topo). This can be tricky so consider using a rope.
27) Vandal and Ann HVS *
Just to the left is a slab, easily identified by some old bits of metal sticking out
1) Climb the slab direct, with a hard boulder problem to start and then some interesting climbing up a shallow runnel. Belay on the ledge. Gear is provided by tying off the metal and Friends.
2) Move right and climb the obvious groove. Things get a little slopey at the top!
Variation - the wall right of pitch 2 can be also climbed 27b Little Gem E1 5b.28) Diamond Sky E2 5b
A fine but negelcted start up the rib/arete to the left of Vandal and Ann. A top pitch can also be climbed - this takes the a rather bold and dirty line 10 ft left of Vandal and Ann. Pitch 1 is worthwhile in it's own right.29) East Chimney Moderate
This is the giant chimney to the left, climbed on the outside edge. "Troglodytes and general deviants" can climb further inside at the same grade.30) Canis VS 4b
A fine route. The line to the left of East Chimney. Climb to a fang of rock then up into the crack on the right. This leads to a ledge and overhang followed by a usually filthy slab leading to the summit.Various pitches, up to severe, exist on the slab to the left - this is the East Face.