< Back to new routes index page
NORTH DEVON AND CORNWALL
Atlantic Coast
Guidebook: North Devon and Cornwall Author/Year: Wilkinson/Hope 2000 Publisher: The Climbers' Club
The Atlantic Coast
Tintagel
Trebarwith
Strand
Kellan
Head
Pentire Area
Stepper Point
Butter Hole
Dinas Head (Trevose)
Cligga Head
Carn Gowla
Tintagel
North Cliff
Astral Weeks
E5 6a *** #
35m A brilliant
climb slicing its way up the awesome wall to the right of the classic Astroslide.
Abseil to the sloping ledge system 'across the void', about ten metres right
of the start of Astroslide. Belay as low as possible down to the right. Climb
up the short rib then swing out on to the wall proper in an 'astral' position
above the sea-filled chasm. Move up to the roof (good gear). Pull over the
roof on small, positive slots and climb directly up the wall to easier ground
and the top. FA
Dave Pickford, Johnny Woods. August 2004. Onsight.
Trebarwith Strand
From the popular bucket and spade beach turn left and walk south past a large cave and round the rocks which protrude on to the sand, just before you enter the next bay look left and you will see another cave, the route is situated on the right of its entrance and is a hidden gem in the form of a steep pocketed black wall of top quality solid rock set like a jewel among a chaos of loose shale,this gives:
Sideshow HVS
5b ** #
35ft Step of the boulder onto the wall and climb it directly,making
a slight deviation right to place a cam in the slot,step back left, now climb
up over the bulge and move right to gain the flat ledge. FA Stu Bradbury 6/7/03
Kellan Head
Stale Digestive
E1 5a 110ft #
Start 20 ft left of Zugzwang. 1) 50ft Climb easily
up a short corner to a couple of small ledges at 25ft then move left and up
to a well protected groove and belay. 2) Move right from
the belay to an exposed position. Continue direct to the top on good rock.
FA Nick Dill, Lee Bartrop 10.5.04
Red Quiny E4/5
5c #
The blunt arete to the left of The Mighty Quin.
Take some slings for spikes! Climb to the ledge below the arete then climb
the steep wall on large holds (also used as spike runners!). A long reach
leads to a jug to the left of a small roof before moving up and leftwards
to a ramp and rest. Follow the ramp and corner above to the top. FA Nic Dill,
Lee Bartrop 8.6.04 After a ground-up attempt Nic resorted to a sneaky
top rope ionspection due to the poor quality of the rock.
Telekenesis E4
6a *** #
100ft The utterly obvious steep v-groove bounding the left wall of
Kellan Arete. Brilliant, intricate technical climbing with good gear, although
a little bold to start.
Start as for Kellan Arete, following the triangular slab to the short corner.
Break left here and move up to the base of the overhanging v-groove, which
is climbed with sustained interest to a wild finish moving out right. Belays
well back. FA Dave Pickford, Emma Alsford. March 2005. Climbed onsight
without pre-inspection.
The Kinetic Confabulator
E4 6a ** #
75ft The strikingly obvious undercut wall to the left of
Consolation. Start directly below the middle of the wall, at a faint line
of weakness through the steep initial bulge. Place a small cam to protect
the first moves and climb through the bulge (crux) to rock-over to better
holds on the wall. Follow a direct line up the wall, on glorious slots and
pockets, to a steep finish on jugs. A marvellous little route. FA Dave Pickford,
Emma Alsford. March 2005. Climbed onsight with no inspection
Pentire Area
Com Head | Rumps Point | North Cliff Area | Great Wall | Black Zawn | Shield Cliffs | Purgatory Buttress | Red Stack Rocks
There are a few pdf guides for sections of Pentire. Both of these were put together by Richard Moss and include some photo topos.
Rumps Point (pdf)
Twilight Cliffs (pdf)
Com Head GR 940805
A ‘mystery crag’ which has obviously seen climbing activity before but not recorded through the usual channels. It’s the obvious landlocked crag ½ mile S of Rumps Point. Non tidal and gets sun later in the day so may be handy to visit after one of the bigger routes at Pentire. Quickest approach is from the ‘Lead Mines’ car park which is up on the R as you drive on the track towards Pentire Farm. Walk to the coast path, turn L (NW) and follow the path for 10mins till just past a knoll you can drop down R to the base of the cliff. Routes described from L to R.
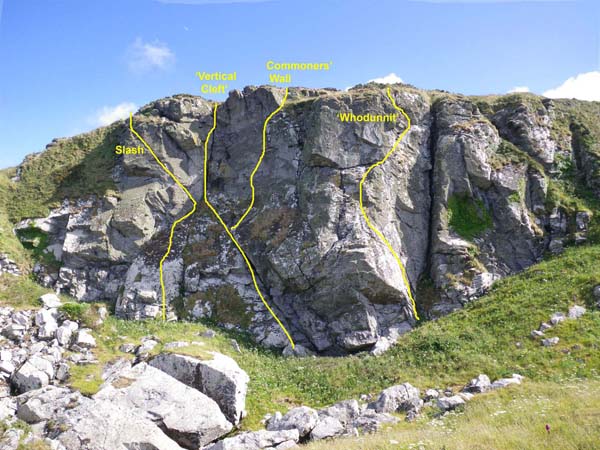
Slash E2 100ft # *
The striking diagonal crack at the L side of the cliff. Steep, exciting and very well protected. Start at the R side of the narrow, tapering slab below the crack.
1 50ft 5a Climb the edge of the slab to gain its front face and climb this for 20ft to a wide crack on the left. Move up R to a stance below the big vertical cleft.
2 50ft 5b Move L and follow the crack, reaching good pockets to its L and finally gaining the prow. A grassy move to the top and gorse belays well back.
FA 8.6.11 Pat Littlejohn, Dave Garner
‘Vertical Cleft’ 90ft E1
The obvious wide vertical crack line towards the L side of the cliff. Start at the big faultline which slants up L to meet the crack.
1 50ft 4c Follow the fault to a grass stance and nut belays beneath the cleft.
2 40ft 5a Climb the crack with continuous interest, past an (unnecessary) in-situ peg.
FA – unknown
Appetite For Destruction E5, 5c,5b (1 rest point) #
100ft. A serious and commiting route giving both strenuous and bold climbing with a peppering of loose rock.
1) Start under the left side of the large roof in the centre of the crag. Climb up and right on steep rock to reach the roof (rusting old peg & nut placement further right). Cut loose (rusty peg) and wildly hand traverse right wards on the rising diagonal handrail until beneath the black streak. Pull up steeply (1 rest point)to gain the belay at the base of the slab(alternativly continue the traverse into the small niche and pull up from there)
2) Follow the black streak up the slab to reach the steep wall right of the hanging arete, pull onto the wall and move diagonally leftwards on pockets to gain a small ledge on the arete, climb the arete to the top with care. FA Stu Bradbury, Nick Dill 16/08/12 Climbed onsight with 1 rest point.
Commoners’ Wall 100ft E4 6a * #
The impressive face R of ‘Vertical Cleft’ gives interesting varied climbing with surprisingly good protection. Start up the big slanting fault as for VC then after 30ft step R to a large foothold on the slab. Pull past a bulge then trend R to a large, quartz-filled scoop. The steep wall above gives a more intense sequence to good finishing holds (and good cam pocket on L). Move R to finish, thread belays above.
FA 9.6.11 Pat Littlejohn, Dave Garner
‘Whodunnit’ 100ft VS **
Nice little route with two contrasting pitches. It takes the buttress R of the obvious vertical chimney near the R side of the cliff. 2 rusting pegs indicate that a more direct line has been done or at least attempted (see 'Axl Rose' below).
1 60ft 4c Climb the slabby face till it steepens then move L and round the rib until good holds lead up and R to a neat stance & nut belays.
2 40ft 4c Move R and follow the crack on perfect jams and jugs to the top.
FA – unknown, climbed 8.6.11 by Pat Littlejohn, Dave Garner
Axl Rose E3 5c * #
100ft A steep route with plenty of character, it takes the steep wall between "Whodunnit" and the wide chimney crack on the right side of the crag.
Climb direct and steeply up the wall on pockets and crimps passing a thread and an old peg(crux) higher up to reach the diagonal crack of "Whodunnit". Step left on to the ledge and climb the headwall just left of the overhang to finish via a steep layback move. FA Stu Bradbury, Nick Dill 11/8/12
Rumps Point
Richard Moss has produced a little pdf guide to some of the fine easier routes at Rumps Point. Download here.
This is the headland to the North of the Great Wall.
Both of these routes are situated on the south side of The Rumps and can be seen across from the Geat wall area which stand out as 3 pinnacles, the climbs discribed are around the middle one and you can abseil in from the side of that pinnicale into the Mussle covered amphitheatre at mid to low tide.
Despite their rather modest size, both routes give a full on north coast adventurous flavour.
The first route is the lefthand Crack (facing in,left of the pinnicale /abseil line) this gives:
Rumplestiltskin
E2 5b #
60ft The thin crackline on the left of the bay, start in the cave
( wet) and bridge your way up to gain the crack, pull round right and follow
it to a steep finish on suspect rock.( Cams useful ) FA Mark Kembal &
Stu Bradbury 30/4/05
Further right of the pinnicale is an obvious wide crack, this gives:
Rumpus E2
5b #
70ft Hand traverse the flat topped ledge on the left to gain access
to the crack by contorted moves ,then jam, offwidth, & squeeze chimney
your way to its top, move right on to a small stance (Gear here) then finish
precariously
rightwards up the loose groove. FA Stu Bradbury & Mark Kembal 30/4/05
Stones of the
Sun E4 5c ** #
90ft The open groove in the steep wall between Rumplestiltskin and Rumpus.
An excellent pitch but unsuitable for those with a cavalier attitude towards
rock and/or protection. Follow the groove to a good wire where the crack ends
at 15m. Move R to a large jug (Friend 3) and climb steeply over the bulge
into the upper groove (stainless peg - not brilliant but very welcome!). Climb
the groove till it is possible to swing L along a shelf to another steep groove
leading to the summit of the tower. FA P Littlejohn, D Garner 23/05/2009 (Abseil
inspected in 2008)
North Cliff
Whistlin' Past the Graveyard **E6/7 6a
The hanging arete left of Psycho bagman gives fine technical climbing but is a very bold & serious lead with limited marginal RP protection and big runouts.
100ft. Start as for Psycho Bagman and make its tricky moves left to gain its shallow groove. Move up the groove for 15ft to place a crucial Camalot 2 in a hole on the right wall. Reverse back down until a traverse out left with your feet just above the void leads to the hanging arete. Follow the arete until a rockover gains a precarious rest on a narrow ledge just right of the arete. Step back left and continue up the arete to reach a sloping grassy ledge with relief. Move right and climb a short wide crack in a block to reach another ledge with an overhung niche, move right again and climb the steep short wall to reach the top. FA Stu Bradbury, Nick Dill. 20/9/12 The route was cleaned on abseil then climbed ground up (ie no top roping). RP protection on the arete pre-placed.
Psycho Bagman
E5 6a * #
The wall to the left of Robert of Pentire features technical climbing
and a significant runout. 100ft From the ledge beneath the
wall climb up easier ground to gain the wall proper. Move up then make committing
moves left to a a groove and gear. Climb up the groove until it peters out;
thin moves lead up to a welcome pocket with good undercut. Finish direct.
Belays about 30 ft back. FA Ben Rowe, Dave Henderson 25/06/06 Ben had
cleaned the line a few months before and expected it to be about E2; it turned
out to be a bit harder!
Between The Great wall and North Cliff
A new north facing wall which is situated at the southern end of the boulder beach of the north cliff area (i.e. just north of The Great Wall). The best aproach is by abseil from an in-situ stake which also provides the belay - this is found by taking the aproach down the steep grass as for The Great Wall but instead of going left onto the path turn right (facing out) and walk towards the edge of the cliff top overlooking the boulder beach. Abseil to a huge boulder which sits above high water in calm seas.
The following routes
both start in the cave/slot and follow fine lines on solid black rock. A top pitch has been climbed
at 5a which finishes on steep scary grass so using the abseil rope to finish may be advisable.
Dark Secrets E2 5b/c * #
60ft Climb into the cave to reach the roof & move out
right to reach the crack in the overhanging wall powerful moves up this (crux)
gains the flake crack
which is followed to the top. FA ,Stu Bradbury, Julian Clelford.1/6/06.
Enlightened Rouges
E4 5c ** #
60ft Excellent varied climbing following the crack which
snakes left & upwards from the left of the cave. Bridge up the cave and
arrange protection on the lip of the roof out left (facing in) gain a jug
hold and move out and up to get established on a sloping ledge shuffle left
to the blind crack and clinb direct up the wall to its right passing a round
crozzly hole and an oval scoop to reach the top.FA: Stu Bradbury, Julian
Clelford 1/6/06
1/6/06.
Great Wall
Switchblade Romance E6 6a, 60 metres *** #
The first route to ascend the full height of the Great Wall in a single massive pitch is essentially a variation finish to pitch 2 of Darkinbad. It includes only 15 metres of new climbing at the top, but gains one of the most spectacular positions on the whole cliff. If climbed as an alternative second pitch to Darkinbad (which would be very worthwhile) the grade is bold E5 6a. The pitch is of a similar difficulty but much bolder than Darkinbad pitch 2. 55 metre ropes will not reach the top – 60m ropes are essential, and 8mm's recommended to reduce weight / drag.
1) 60m. Climb Dislocation Dance / Pulses Unreal to the belay of Eroica. Climb the Eroica crux and then head straight up into the groove of pitch 2 of Darkinbad. Follow this for 8 metres until the point it veers dramatically leftwards. Place bomber gear (the last for 10 metres) and swing wildly out right along a hanging rail of slopers to gain the suspended arête between the Darkinbad and Eroica grooves. Take a deep breath, launch up for a hidden jug, and then boldly press on up the hanging groove (crux) to gain the big sloping ledge near the top of the crag. Finish up the last 5 metres of Darkinbad pitch 2.
FA Dave Pickford, Max Dutson. September 6th 2012 (flashed after abseil cleaning)
Dave Pickford has added a first pitch to his Wall of Spirits - sounds like it could be a 'popular' E6 in it's own right:
Wall of Spirits (Pitch
1) E6 6b *** #
160ft Climb Black Magic all the way past the crozzly pocket and through the
crux, to the 'rest' at the old, snapped-off peg. Arrange gear (small wires
and cams) and make a tricky sequence out left into the centre of the wall
between Black Magic and the finish of Darkinbad. Follow an obvious line of
holds up shallow cracks (small wires and cams) to arrive below the small,
slightly arched roof right at the top of the lower shield of Great Wall, directly
below the top pitch of Wall of Spirits. Make committing moves through the
roof on slopers to a precarious finish which leads to the big shelf below
the impending wall of pitch 2. Put in a runner for the second and scuttle
right to the belay of Black Magic. FA Dave Pickford (unseconded) June 2006.
Climbed after abseil inspection. A few wires were left in-situ on the first
ascent due to poor conditions, the gear is not too hard to place however,
and is more plentiful than on the crux section of Black Magic itself.
Wall of Spirits E8 6b **
100ft From the Black Magic stance, place a wire in the corner
and shuffle with trepidation out along the ledge until below and just right
of a blade peg. Make a long stretch for holds below the peg, from where it
can be clipped and a fortuitous 2.5 cam placed in the pocket next to it. The
last gear of anything more than psychological value... Some nice climbing
leads up and right from here, past another blade which is in about 15mm, up
to a slim and alarmingly expansive flake, behind which I tapped a final blade
peg. Take a deep breath and make a precarious traverse out to a 'rest' in
a vague depression a metre right of the arete. Throw destiny to the wind and
climb up then move left to the right arete of the Eroica groove. After a move
up the arete, a 'thank god' rockover leads back into classic ground and sanity...
Finish up Eroica. FA Dave Pickford 9/04 Second ascent Dave Henderson Summer
05
Abracadabra Arête E7 6b/c *** #
The awesome hanging arete of the final groove of Eroica demands an enchanting combination of bold and technical climbing. The Master’s Edge of the South West?
100ft) Start at the 1st belay of Eroica on top of the massive flake. Climb the Eroica crux and follow the route up and right to the point at which the compelling arete looms immediately above. Place bomber gear here and make a series of hard moves right to gain the true arete. Some tricky movesa gain a good stainless steel peg and a rest (Friend 1.5 in an unreliable pocket just left of the arete here too). Committing and increasingly bold moves now lead up the very apex of the arete (crux), in possibly the wildest position on the crag, until a rockover move allows better holds to be gained on the left. Continue direct up the arete to the point where Wall Of Spirits moves around into Eroica, which is followed to the top. FA Dave Pickford, Max Dutson (flashed after abseil cleaning and inspection) June 23rd 2011
Eroica Should now be considered hard E3 as the aid peg is missing!! If you take the traditional belay (at the top of the flake, just beneath the crux/aid move) a fall would be serious so be careful - recommended to climb one long pitch to the base of the final groove.
Welcome to Bedlam E5 6a (1 rest point) #
1) 75ft 5c. Climb the initial groove of Last Leviathan to reach the ledge on the right and belay below the corner of Over my head.
2) 75ft 6A. The steep greasy crack in the wall above the belay between LL and OMH provides an arm pumping and nerve shredding pitch on suspect rock.
Climb the short steep corner below the main crack to reach a wobbly handhold, with care pull up and stand on the wobbly hold and follow the crack it into the niche above, move up steeply to gain a ledge on the left, now follow a series of ledges to reach a grassy stance and double peg and cam belay.
3) 40ft. Climb easily up grooves and grassy ledges to reach stake belays at the top.
FA:Stu Bradbury, Mark Macmanus. 23/4/2011.
Black Zawn Area
The Finger Severe
#
45ft On the pinnacle described in the approach to Black Zawn and
above the left of the Shield Cliff. The route takes the deep crack/groove
on the east face until forced out onto the seaward face which is followed
to the summit. The rock is surprisingly sound. FA Colin Milton, Simon Murphy
27/09/03
Sister Ray E4
6a * #
An exciting alternative finish up the smooth wall and steep prow to the left
of Brother Chris. 1) 50ft Follow Brother Chris to the crozly
pocket and crucial gear. Make a move up and left before a very thin traverse
leads left to excellent holds just before the bottom of the hanging groove
of Coal Comfort (good essential small wires). Pull up right and finish direct
up the steep prow to thank god pockets on its left hand side. FA Ian Parnell,
Dave Pickford 26 May 2007 Climbed after pre-practice will be blind and
hard for the grade to onsight.
Heavy Blood E5
6a (1 rest point) **
The sweeping hanging ramp below the main overhang of the right hand
shield cliffs gives a sustained and committing fight. 120ft) Start
10ft right of Pounding Heart and climb easily to the righthand end of the
main overhang. Follow the horizontal crack and hanging “slab”
leftwards with increasing difficulty to a short hanging corner. Particularly
steep and worrying moves lead left to the finishing continuation break. FA
Ian Parnell, Dave Pickford 25 May 2007 Climbed onsight
The Shield Cliffs
Ian Parnells route The Crusade has seen a repeat (apparently the majority of Ian's North Coast routes remain unrepeated) - confirmed at E5 with good though strenuous-to-place protection. Quality 3 star route, the quality of climbing being comparable to that on Darkinbad or Black Magic but not quite as big (but a bit steeper!).
Istanbul E5 6a
(**) #
Excellent climbing on the wall right of The Crusade. Start from tidal
ledges at the the base of the wall (or on non-tidal green ledge a little higher)
80ft Climb an easy groove on the right until a step left gains a sloping
ledge below the main wall. Climb direct above this (useless old situ wire)
to a large hold at the base of the hanging groove. Make a tricky move up using
holds on the left edge of this for a body-length then move left onto the wall
and up left to better holds and gear. Climb directly above this and slightly
right to gain a sloping break below a small overhang. Step right to finish
up the easy groove. FA Dave Henderson, Tom Rainbow (onsight) 22 July 2002
Kandahar E5
6a/b ** #
The last ‘big’ line on The Shield taking the obvious rightward-slanting
groove / crack that Istanbul right of Istanbul. Magnificent, powerful climbing.
Follow The Crusade to below the hanging groove. Climb the groove to the top
with interest. FA Dave Pickford, Ian Parnell (on sight) May 2007
Groove of Shadows
E5 6a/b ** #
The steep diagonal line underneath Parnell’s route Heavy Blood and Pounding
Heart - Western Groove. A route on which the racing ‘Hare’
may fall foul of the slow but clever ‘Tortoise’. A bit of a shimmy-shammy
and a whisker-frisker leads briskly into the giant break of the route formerly
known as Resounding Fart, at which point wind may be broken prodigously. Climb
in a generally upwards direction over the roof into the hanging groove above
Resounding Fart. After the tricky roof the groove gives straightforward
climbing. Belay well back. FA
Dave Pickford, Ian Parnell (onsight)
The North Ship
E6 6a/b ** #
The audacious and compelling direct on Pounding Heart. Follow that
route until the point at which it traverses left. Climb boldly upwards until
the sanctuary of a giant thread is reached. Finish easily. Belay well back.
FA Dave Pickford, Ian Parnell (after abseil inspection - not top roped)
Purgatory Buttress
Pugin HVS 5b #
40ft. Start just left of Sinners. Follow pockets up the wall to the half way brake, step left onto the ledge. Now follow the arête to the top. FA Richard 'Mosseee' Moss, Hannah Woolley2/9/08
Red Stack Rocks
Descend as for Touch the Devil but turn left where you'd go right for Touch the Devil. A short traverse leads to a bottomless gangway sloping down to the sea. This is just before a large cave. The steep 45ft wall above the gangway is home to the following:
Polmorla E6
6b (**) #
Excellent climbing but with a potentially serious (if the wire rips!) crux
at the top. Start near the left side of the wall and make a rising traverse
rightwards on jugs until they run out. Move up (poor peg on right - removed
by hand!- short Lost Arrow) (crucial rock 3 up left) then climb steeply above
to finishing jugs. FA Dave Henderson, Simon Young 18 July 2002 (after abseil
inspection).
Descend to the promontory adjacent Red Stack Rock (the small island a few a few hundred yards West of Touch the Devil). Scramble down the promontory above the zawn, from where a large black wall is seen. To the right of this is an obvious fin/arete, taken by the following route:
Approach: is easiest by abbing straight in (either blindfolded or to the side of the route to preserve the onsight!).
Enola Gay E6 6a
(**) #
A very fine line which is serious. 80ft Belay beneath and to the left
(facing in) of the the arete. Traverse right for a few feet and up to gain
a small ledge on the right. Place gear in the crack on the right then move
left to arete. Blast boldly up this direct, using holds on both sides until
a good hold is gained after a 15 feet (Crucial gear: Poor Rock 5 down and
left - you've already climbed passed it but it's easier to place from the
good hold. There is also a reasonable RP 5 to the right). Finish pretty much
direct up the arete above to gain the slopey ledge above and the end of difficulties.
A groove above leads to a step right at the top and belays on the ledge above.
FA Dave Henderson 18 July 2002 (abseil/shunt inspection)
The following routes
are found on a buttress which lies between 2 caves to the right of the grooves
of Goth and Turk (looking in). They all start at easier slabby rock just
left of the righthand cave, and are easiliy identified by criss cross cracks
on the steeper face in the middle just below a cave recess.
Dancing in the Danger Zone E5/6 6b *** (1 point of aid) #
80ft A superb route taking a strong natural line through
some impressive terrain on good rock, giving powerful and technical climbing
through the grooves and overhangs above the cave. 1. 6b 50ft.
Start at the tidal boulders at the cave entrance, climb the slab on the left
(facing in) by its right side and make a diagonal traverse rightwards over
the cave, difficult moves allow entrance to a restricted scoop then strenuous
and technical moves right and up gains the hanging V- groove/scoop below the
overhang (aid point) pull over this to reach a diagonal right to left crack
under the roof, undrcut this leftwards until a pull up and round gains the
large scoop and belay. 2. 5c 30ft. Move right into the steep
corner and climb it to the top. FA. Stu Bradbury, Maciek Affeldt . 20/8/05
(onsight with 1 point of aid) "This has to be one of the best onsight
routes I have ever climbed and I have every intention of freeing the aid point
at the earliest opportunity it will be E6 without the aid point"
The Following route is situated between "Dancing in the Danger Zone" and "Safe Haven" and is best reached by abseil on to the flat platform oppersite the Red Stack Rock as described in the guide . Scramble down left looking in to the base of the obvious leaning rib/arete just above the sea.
Grave Dancers Union E2 5b
80ft Start off the block and pull up onto the rightside of the rib, move around just left the rib and climb to where it steepens, place gear and move back right and pull up steeply to a small stance, continue boldly to reach a horizontal crack below the short headwall from here make an exposed move left to an easier finish. FA: Stu Bradbury Nick Dill. 8/10.
(I'm not sure of the exact location of the following 2 routes)
Catweasle E3
5c * #
75ft Climb the centre of the slab to reach the criss cross
cracks follow the left to right trending crack to gain the large scoop/cave
to below a roof then climb the wide crack on its left above a large suspect
block and finish up the groove above. FA Stu Bradbury,Nick Dill .15/7/05.
Dill Pickle
E1 5b #
75ft Climb the left side of the slab to reach the criss cross wall
and follow the right to left crack until it is possable to pull round into
a short corner on the left, climb this to the left end of the scoop/cave just
slot/ crack, climb this into the groove which leads to the top. FA. Nick Dill,
Stu Bradbury. 15 /7/0
The following routes are situated on the Red Stack rock itself and are found on its north facing wall and corner, they are only accessable for about one and a half hrs eitherside of low water in calm seas from the barnacle covered platform at the base of the wall.
Curved Air
E4 5c ** #
70ft Excellent varied climbing. Start in the corner &
follow the wide curving crack up the overhanging wall left of the corner to
reach the sheild at its top,arrange protection then move up and leftwards
in an airy position on brittle holds to gain a protruding lump on the arete
around to the left,climb the arete and hanging slab to the top. FA. Stu Bradbury, Nick Dill .16/6/06
Nessy Corner E3 5c* #
60ft Climb the barnacle covered corner to a ledge,move up
to reach the overlap, bridge and contort over this by some tricky moves to
gain another ledge and climb directly up the wall above to finish. FA. Nick Dill, Stu Bradbury. 16/6/06
Descent is made by abseiling from a peg.
Stepper Point
Maggie’s Mistake seems to have suffered a major rock fall and is now more like E1 5a (still worth a star). Calling this ‘Cave Area’ may no longer be appropriate. (Reclimbed 7.6.11 Pat Littlejohn, Dave Garner)
Butter Hole
On the N side of Butter Hole is the striking, light-coloured shale cliff taken by Mind Field. It can be approached from the beach around low tide (faint path leads down into cove c.30m E of top of crag) or at higher tides by abseiling 55m from obvious rock spikes above the crag.
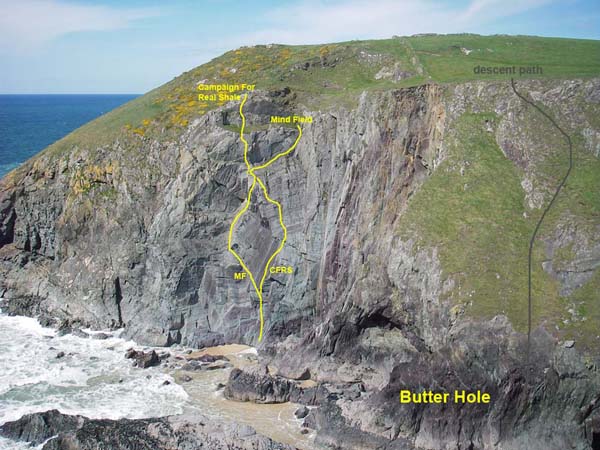
Campaign For Real Shale Mild XS 180ft #
Serious but surprisingly worthwhile, with better rock and climbing than Mind Field. Start as for Mind Field at the big L-slanting crack/overlap.
1 120ft 5b Follow the overlap for 20ft then strike R-wards up thin cracks and after 20ft move R to a wider crack near the arête. Above this gain the slab and climb it, eventually moving L till beside the pinnacle/flake of Mind Field. Continue up then L to belay (as for Mind Field) below a good crack (small cams here and good nut placement lower down).
2 60ft 5b Climb directly via a steep, slim groove to a shelf just below the top. Step L then finish direct to a grass ledge, then easily up the short wall to spike belays.
FA 7.6.11 Pat Littlejohn, Dave Garner
Dinas Head, Trevose
GR 847762 A diminutive crag of good volcanic rock which has scope for several short, hard climbs. An easy descent on the N side gains sloping ledges at the cliff base exposed at most states of the tide. There are two areas of steep rock separated by a zawn. All routes 13-15m long.
Nanoramp HVS 5a is non tidal and takes the R-ward rising ramp above the overhangs of the left hand area. R of the overhangs is a smooth grey wall whose R edge gives Nanorib HVS 5a. This starts boldly then moves into the lefthand groove after 4m. R of this is a slabby ramp (V Diff) then where the ledges are terminated by the zawn, a rough slab and L-slanting ramp give a line of Diff standard. The bulging rock above the zawn (Rh area) is approached easily from the south and the groove R of the overhangs is Nanogroove HVS 5a.
All routes 6.6.11 Dave Garner, Pat Littlejohn (various leads)
Newquay
How to get there: The zawn is located on the north side of Pentire headland. Parking can be found on the road that runs along the northern side of the headland by south fistral. Follow the coastal footpath (sticking right by the cliff top not the large bridle path) for about 5 mins, a narrow zawn will be seen. The only climb takes the corner immediately in front of you. The zawn is tidal and can only be reached by a wade/ swim. Take care of the swell and tides in this area. The climbing takes is found in a very narrow and rather uninspiring zawn. The rock is for the most part fragile the one route recorded here climbs a corner and slab, which provides relatively secure rock and adequate protection (apart from the top 20). Belays were from a car driven and parked up the footpath using a 60m-ab rope trailed down to the necessary area!
Cornflakes
HS 4b
40ftish Climb the obvious corner where the slab meets a wall. Climb this
in its entirety. At the top step up and right and follow the easiest and most
secure line to the top (if there is one!). An ice axe may prove useful at
this point. Belay using your imagination! FA James Hoskin, Ian Stocker 2001
Cligga Head
Wolframite
E5 6a ** #
The hanging arete on the right of the corner just to the right of Fingerin'
the Dyke (page 276 of the current guide). Short abseil down the corner to
ledge above (calm) high tide. Belay on the ab rope. Short route but good rock,
excellent moves and position. 50ft Climb to the overlap and
pull through on to the arete, from the rounded break use a small but perfect
crimp to attain the next sloping break. Finish easily. Good micro wires protect
(RP2s and HB3s). FA John Fletcher and James Strongman - 21 July 2002. first
ascent photo
Carn Gowla
Baptist Cliff Rockfall - Luke Pavey reports: "there was a big rockfall end 2003 which took away the start to the Baptist, Welcome to the Human Race and Elixir. The Diabolist, however, I've re-climbed at E2 5b with about 5 points of aid! on the good clean rock groove left after the rock fall. It needs freeing at well protected 6a/6? to make a two star route again".
Razorbill E2
5b *** #
Takes the superb quartz-lined groove to the right of Deceleration Lane (DL).
Start 5m right of DL at a left-slanting, easy angled corner. 1. 5b
Follow the corner past guano infested ledges to the base of the groove. Follow
the groove until it ends at a convienient belay ledge. 2.
Escape as for DL. FA Martin Haycock, ? 2005
Phantasm E3/4
6a *** #
140ft This takes the long, defined crackline, immediately
right (looking in) of Supernatural. Abseil in as for Supernatural but go past
the stance to arrive at the base of the long crack at a patch of luminous
seaweed (can be easily seen from above),start here. Follow the crack all the
way until it ends at a jug, traverse horizontally left to finish on the final
moves of Supernatural. FA martin haycock & james forbes 21.06.05
Coastguard Cliff
Crystal Vice
HVS 5a #
A good route with good protection & moves unfortunately marred by very
poor rock. start 30ft right of Desire (looking in) at an open groove with
a flake/crack (the right wall is covered in quartz). Pitch 1 50ft. Climb the
groove with sustained interest, after surmounting a bulge near the top, step
left and finish up grass slopes. Scaffold pole belay. FA M. Haycock and N.Braddon
03.03.07
(The following route may be the same as the previous??)
China Groove HVS 5a *
50 ft Climb the striking corner to the right of desire, pleasant technical climbing, very enjoyable. Gareth palmer/ kevin lowry 10 april 2011
Teflon Slab Area
Eskimo Severe
110 ft Climb the very right hand edge of the teflon slab
from about 40 ft above the sea, start from a good platform climb to the slab
going to the right,then keep going to reach the abseil point. FA Gareth Palmer,
Kevin Lowry 4/8/2004
Vault Wall
Blue Skies And
Butterflies HVS 5a #
100ft A plesant route,Start at the foot of the obvious corner right
of Demerara.Climb the corner with good protection and holds to the top. FA
Luke Pavey (rope solo)9/7/2005
Tut Crack VS
4b #
80ft Belay at the foot of the corner(as above).Climb the arete for
a few feet then step right up tut crack to tut top,very pleasant. FA Luke
Pavey (rope solo)10/7/2005
Mercury Area
Silent Witness E1/2 5a/b #
Start 5m right of terra nova at the start of a steep groove,reached by 70m abseil (stake may not be in place). 90feet. 5a/b Climb the groove until at 5m traverse left onto the open wall and continue up to rejoin the open groove and large stance on right. 120ft 4b follow a direct line up the now vague open groove to reach the belay stake. FA luke pavey(rope solo)17.8.05
Indian Buttress
Indian Summer E3
5c * #
A good route which takes the right wall of the corner of Alex of Gowla. 120
feet Start on the grey ledges, as for Indian Country. (Note that these
ledges are above high tide level) Pull leftwards into a groove on the blunt
arete, and climb to the top of the groove. Continue up the left side of the
arete to gain a shallow open corner. Climb this to a small flake (thin tape
runner) then climb the wall above on positive holds (crux), trending left
on better holds, to finish up the final easy corner of Alex of Gowla. FA Andy
March, Luke Pavey, 15th September 2002
Hopes and Fears
Hard Severe 4a #
80ft To the right of Indian Buttress is a smaller buttress.
Abseil to a good ledge above sea level then climb diagonally left along a
good ledge, then make a steepish move up to gain the easy slab go up to good
belays. FA Gareth Palmer, Ed Moss 16/6/2004
Susan
E2 5b *** #
50ft From the same ledge as hopes and fears, climb to the corner
on the right then move left to make some hard moves to gain the steep crack
follow this to the top, very well protected. FA Luke Pavey, Gareth Palmer
6/2004
Siouxsie and
the Banshees E1 5b #
100 ft. 1) From the ledge of Hopes and fears move up and rightwards
from the corner, then traverse across the slab with increasing difficulty
useing small holds untill reaching a corner. Climb the corner to belay on
a pedestal. 40 ft 5b. 2). As for The Sharman 60ft 4a. gareth
palmer and kevin lowry 18/9/2005 NB.Low tide and calm sea is esential.
Eskimo Severe
#
110 ft Climb the very right hand edge of the teflon slab
from about 40 ft above the sea, start from a good platform climb to the slab
going to the right,then keep going to reach the abseil point. FA Gareth Palmer,
Kevin Lowry 4/8/2004
Solid Ground
E1 5a * #
80ft. A good counter-diagonal to Touch The Earth with a steep start
and a bold finish. Varied small protection useful. Start on the Spirit ledge.
Step right and pull onto a foot-ledge. Above and left is a thin wet crack,
crucial fiddly protection. Pull up steeply and trend right to easier ground,
joining TTE at a faint scoop. Hunt around for vague protection before climbing
directly up the juggy wall to finish. FA Matthew Thompson, Mark Stephen Davies,
23.05.07
C Buttress
Sunny Delight
E1 5a* #
100ft Climbs the arete left of Rainbow Games on good holds
after a tricky start to a juggy finish - pure heaven. FA Luke Pavey, Sam Palmer
2.9.03
The next routes lie on the narrow end wall of C Buttress (left of Looking For a Rainbow) abseil down to low tide ledges at the foot of the wall.
Kate HVS 4c*
#
90ft Climb the arete on the right, by climbing on the right
side of the arete(steep)to reach the half way leadge,step right and follow
the arete of sunny delight to the top. FA Luke Pavey, Kate Lyons 4.9.03
Phoenix Nights
HVS 5a** #
90ftpleasant climbing,taking the thin crackline on the right side
of the wall.climb a grey wall direct to the centre of the overlap,step left/back
right following the crack to the ledge,climb the blank looking wall staight
to the top. FA Luke Pavey, Kate Lyons 4.9.03
Outside Edge
HS 4b #
80ft Climb the left edge of the wall, follow a crack passing a nlche
to the ledge continue up the edge to the top. FA Luke Pavey, Kate Lyons, Sam
Palmer 2.9.03
Star Wars E2
5b * #
This route takes a traverse line across the overhanging wall in the chasm
between the mainland and C buttress, it never gets sun and will take a spell
of good weather to dry. 1.70ft 5b,start as for outside edge
at the base of the arete,traverse left along a ledge into the darkness easy
at first past several hard moves up to a spike/runner,move left into a chimney
climb this to belay at its top. 2.60ft 5a,move left across
a ledge to an obvious flakeline which is followed leftwards until it ends,step
left climb the groove to the top. FA Luke Pavey, Gareth Palmer 5.9.03
Skirmish Cliff
The cliff has an obvious central pillar, taken by:
Storm in a D
Cup Hard Severe 4b *** #
100 feet The seaward face of the pillar contains a fine crack - you
don't get many like this at Carn Gowla! FA. David Hope, Scott Elwood, 27.08.2000
The right-hand side of the pillar is an obvious groove.
Bra Wars
E1 5b * #
90 feet Climb up from sea level ledges and pull up a thin overhanging
crack in a block to the right of the main groove. Traverse left 5 feet to
the groove and follow to the top, finishing with a diagonal leftwards move.
FA. David Hope, Scott Elwood, 28.08.00
The left-hand side of the pillar is provided by a slabby groove.
Hello Boys! E2
5b #
90 feet Climb broken steep rock on the left of the pillar
to a good crack leading to the corner. Continue up the corner and slab until
ten feet below the top then traverse left for 15 feet to reach the top by
a blocky flake. Care needed. (Pre-placed belay from small outcrops 50 feet
above in grass slopes.) FA David Hope, Scott Elwood, 28.08.2000
Tit Bits Severe
4a #
70 feet Climbs an escapable groove 40 feet to the left of Hello Boys.
Reached by scrambling in from the left (facing in) to sea level ledges. FA.
David Hope, Scott Elwood. 27.08.2000.
Cave Wall Area
Inspector Clueso
HVS 4c* #
150 ft Takes the obvious clean open groove above and left of the
adit. Start just left of the adit climb bearing left slightly over loose ground
to steep moves and good protection gaining the open groove,follow the groove
delicately and climb direct to the top. Good belay cracks higher up.FA Luke
Pavey, William Morelli 19/06/2004
Walking on Sunshine
VS 4b #
90 ft. A very plesant route up the left-hand side of the upper slabs
start at the top of the descent rake by traversing easy ledges to gain thread
belays at the top of the gully.move up into the short corner and step right
onto the slab,continue more-or-less direct to the top on good rock.FA Luke
Pavey (roped solo) 06/2004
Left Hand Red Walls
Two Score and
Ten HS 4a #
A poorly protected route. 90 ft Start for Weightout
trend rightwards to the large niche and up by the way of the groove. Follow
the break to the top via a harder move left, belay of the abseil rope. FA
Kevin Lowry, Tom Palmer, Gareth Palmer. 31/05/2009